--> Blogging By Doing | Deskripsi Singkat Blog di Sini

Blogging By Doing

Provides you different way of blogging.


Wednesday, January 18, 2012

About Read More on Your Post

About Read More on Your Post


What is Read More link? It is a link that takes the reader to read the full post. So, if you want to read the full post you have to click the read more link. You can see the example on this blog. You will find it at the right bottom of the post on my homepage or showed by this picture.

The tutorial here is about to make Read More link automatically. You just need to add some CSS code then your post will automatically added Read More link.

According to me, the read more link is very useful to your blog. First, let's see my blog post. Sometimes I need to insert some pictures on the tutorial post like here or here. Unfortunately, some visitors come with low internet connection. They will need more time to load my blog on the front page because too many pictures to load, right? It is lucky if they will wait, but if not they close the window. So, with Read More link automatically here, I do not need to be worried about losing visitors.

Some SEO Masters recommend to use Read More because it will increase your blog pageview. Pageview is the number of your blog page is viewed by the visitors. If it is increase, your blog ranking might be increased too. Without Read More, your page is viewed once by one visitor because your post is fully loaded. But, with Read More your page is viewed twice by one visitor to read your full post.

How about losing visitors to read our full post? Then you have to read this and try to make a strong writing. Because with Read More, our blog is more presentable and attractive by its tidiness and professional.

So, use Read More link on your post. Go here to get lead how to facilitate Read More link on your post automatically.

Read others here:
Make Read More Link on Your Post Automatically

Make Read More Link on Your Post Automatically

On About Read More on Your Post, we talk about the function of Read More. Here, I try to show you some steps to make it. I got this steps from a website a long ago, but the site cannot be accesed somehow. I hope this works well for you.

1. Log in to your account at blogger.com and then go to Template > Edit HTML. After that you will asked not to change the CSS code except for advanced users. We assume that we are advanced users and choose proceed.


2. Before adding new code, checked the checkbox of Expand Widget Templates.


 3. Look for this code </head> and then copy this code below and paste it right above </head>.

<script type='text/javascript'> var thumbnail_mode = &quot;no-float&quot; ; summary_noimg = 430; summary_img = 340; img_thumb_height = 100; img_thumb_width = 120; </script> <script src='http://rizqi.moehamed.googlepages.com/read-moreotomatis.js' type='text/javascript'/>

4. Use Ctrl+f to search this code <data:post.body/> or <p><data:post.body/></p> and change it with this code below.

<b:if cond='data:blog.pageType != &quot;item&quot;'> <div expr:id='&quot;summary&quot; + data:post.id'><data:post.body/></div>
<script type='text/javascript'>createSummaryAndThumb(&quot;summary<data:post.id/>&quot;); </script> <span class='rmlink' style='float:right;padding-top:20px;'> <a expr:href='data:post.url'>&#187;&#187;&#160;&#160;Read More...</a>
</span>
</b:if> 
<b:if cond='data:blog.pageType == &quot;item&quot;'><data:post.body/></b:if>

5. Save your Template and you post will be added by Read More automatically.

Note:
The blue text can be changed as your will.
--> summary_noimg =  Article's height cutoff without images
--> summary_img  Article's height cutoff with images
--> img_thumb_height = image's height to be showed on summary
--> img_thumb_width = image's width to be showed on summary
--> Read More... = can be changed READMORE HERE ...


Tuesday, January 17, 2012

no image

Strong Writing --> Good Blog --> High Traffic

This post is written as my experience as a new comer who is looking for some blogging tips about how to increase the number of visitors to our blog.

Let's talk about a blog, about the reason you make a blog.
Most people make blog to be their personal web. It means like their online diary. They write about what they do today, what they feel, who they meet at the mall, where they go with some friends after work, etc. I can also be filled by their opinion about environment, government or maybe politics. That are some people.

For the beginning, some of them make blog as a personal web and turn their mind to earn some money by blogging. Following some affiliate programs, adsense, or register to pay per post program. The only one needed is high traffic to their blog to earn more money.

The question here is,
How to make more visitors visit our blog?
After asking grandpa google, I have some good article about how-to-manual to increase you blog visitors (i.e; high traffic). Some of them are,
1. Register your blog to some search engines. You can read here to register your blog to Google search engine.
2. Use a SEO friendly template for your blog.
3. Make a strong writing.

The last is the simple one because you just focus on your blog content. I think we learn to write since we are at elementary school, so you just need to choose the right topic for your blog. Focus on one topic and follow the trends what people need to know at this time. You can know the trends by the news, forum or you just believe in your guts.

Happy blogging all.

Monday, January 16, 2012

3 Recommended Site for Parsing your HTML Code

3 Recommended Site for Parsing your HTML Code

Accordingly, there are 3 recommended site for parsing the HTML code. Here they are.

1. Centricle.com, the rule here is simple. Paste your HTML code in the box given there and then click Encode button. It will showed the parsed code that can then be pasted back in your blog. Click Decode button to return back your HTML code. Here is the screenshot.


2. Blogcrowds.com, quite same with number one's rule. Paste your HTML code in the box given there and then click red Parse button. It will showed the parsed code that can then be pasted back in your blog. Here is the screenshot.


3. Accessify.com, the last one has different name, it called quick escape (i.e; parse or decode-decode). Paste your HTML code in the box given there and then click Convert to escaped characters -> button. It will showed the parsed code that can then be pasted back in your blog. Here is the screenshot.


That's all. I hope it is useful.

no image

How to Show HTML Code in A Post

This blog promises to provide a different way of blogging. For a moment, as a new comer, I feel down because I can not show some HTML codes that are needed to be showed. But, all I need to do is ask grandpa google and find some good articles.

For example:
I want to show this HTML code below to show you the code to make a link of my blog.
<a href="http://bloggingbydoing.blogspot.com">Tyo's Blog</a>
If I type the code and then showed as this link below (the link on your blog after paste it). But, I need to show the code, so you can copy it.
Tyo's Blog

The codes need to be parsed to be showed as a HTML codes. Manually, change <, > and " with &lt;, &gt;; and &quot;. So, we need to type this code in HTML mode:
&lt;a href=&quot;http://bloggingbydoing.blogspot.com&quot;&gt;Tyo's Blog&lt;/a&gt;
It is not an effective way if we parse a long HTML code manually. Can you imagine to parse this code below? When will you finish it?
<script type='text/javascript'> var thumbnail_mode = &quot;no-float&quot; ; summary_noimg = 430; summary_img = 340; img_thumb_height = 100; img_thumb_width = 120; </script>
<script type='text/javascript'>
//<![CDATA[
function removeHtmlTag(strx,chop){
if(strx.indexOf("<")!=-1)
{
var s = strx.split("<");
for(var i=0;i<s.length;i++){
if(s[i].indexOf(">")!=-1){
s[i] = s[i].substring(s[i].indexOf(">")+1,s[i].length);
}
}
strx = s.join("");
}
chop = (chop < strx.length-1) ? chop : strx.length-2;
while(strx.charAt(chop-1)!=' ' && strx.indexOf(' ',chop)!=-1) chop++;
strx = strx.substring(0,chop-1);
return strx+'...';
}
function createSummaryAndThumb(pID){
var div = document.getElementById(pID);
var imgtag = "";
var img = div.getElementsByTagName("img");
var summ = summary_noimg;
if(img.length>=1) {
imgtag = '<span style="float:left; padding:0px 10px 5px 0px;"><img src="'+img[0].src+'" width="'+img_thumb_width+'px" height="'+img_thumb_height+'px"/></span>';
summ = summary_img;
}
var summary = imgtag + '<div>' + removeHtmlTag(div.innerHTML,summ) + '</div>';
div.innerHTML = summary;
}
//]]>
</script>
 Finally, you can find how to parse or encode-decode this HTML code here.

How to Register Your Blog to Google Search Engine?

How to Register Your Blog to Google Search Engine?

Some of blogger think that their blog has been indexed by some Search Engine. The fact, it will not be indexed by any Search Engines if you do not register it. Just like at school, we need to register if we want to be in the student list. So you need to register your blog to Search Engine to be indexed if you want to attract more visitors.

Here are the steps that you need to register your blog to Google Search Engine. Why Google? Because It is one of the famous Search Engine in the world.
1. Go here or type http://google.com/addurl from your browser.
2. Fill the URL box with your blog's URL. And then type the verification words.

3. Click the Submit Request button.

After submitting, you need to wait around 2 weeks and then try to search your blog in Google. It works when your blog is appearing. Otherwise, you have to re-submit your blog again and wait until your blog is indexed by Google Search Engine.

Or you need to keep blogwalking to get more visitors to your blog. :)

How to Make a Blog in Blogger.com?

How to Make a Blog in Blogger.com?

If you are a web master, you should not read this post. This post is for a beginner.

First step that you have to do for blogging is you must have a blog. You can have a blog easily now. There are many sites provide you a free blogging way such as blogger.com, the one we talk about here. On this post, you will lead how to make a blog in blogger.com.

Here are the steps that you need to do.
1. Go to blogger.com
2. On the front page, you can find Sign Up for a New Google Account at the right-top corner. And then, click it.

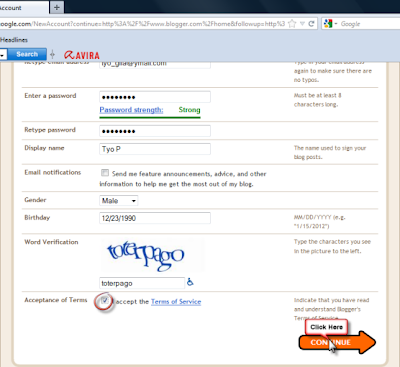
3. You have to fill the box the information they need, such as email address, your password, your name, your gender, your birthday and then a verification word. After finishing it, do not forget to check the checkbox of Acceptance of terms then click Continue.

4. You just made a Google Account. To have a blog, you need click New Blog button or "Blog Baru" button if you use Indonesian Language.


5. The last step is filling your blog tittle, blog address and choose your blog template. And then click Make Blog! button or "Buat Blog!' button at the bottom dialogue box.


That's it. Now you just had a blog. Happy blogging :) for you.